Documentation
- Main Window
- Working with Documents
- Importing images from scanners and cameras
- Guides and Grids
- Plugins
- Pen Tablet Support
- Customize Keyboard Shortcuts
- Customize Performance
- Manage Languages
- Palettes
- Custom Palettes
Paper Textures
In the real world, a marking tool has different results when applied to surfaces with different textures. Artweaver allows you to control the texture of the canvas to achieve the results you’d expect from natural media on a given surface..
You can use paper textures in many ways. Brushes interact with paper texture, just as natural tools react with the texture of the surfaces beneath them.
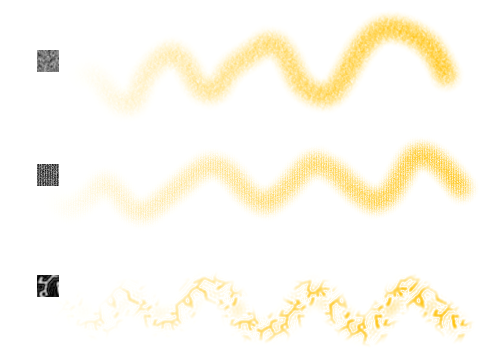
Most of the brushes interact with the current paper texture.
Choosing Paper Textures
The Paper palette is where all paper textures are stored. In addition to using it to select papers, you can use this palette to invert, resize and control brightness and contrast.

Paper palette
To choose a paper texture
- Choose Main Window menu -> Window -> Show Tools to display the Tools palette
- Click the arrow next the paper texture preview
 . The Paper palette is expanded
 - Choose a paper texture from the Paper palette
 Artweaver tiles the paper texture to cover as much canvas as needed.
Artweaver uses the currently selected texture. You can make a few strokes, and then change the paper and make a few more strokes to get different results.
To capture paper texture
- Open or create an image
- Select all or a piece of your image
- Click the arrow next the paper texture preview . The Paper palette is expanded
- Click the palette menu arrow
 , and choose Capture Paper
 - Type the name of your new texture, and click OK
To import paper texture
- Click the arrow next the paper texture preview . The Paper palette is expanded
- Click the palette menu arrow , and choose Import Paper
- Choose the file you want to import, and click on OK
To edit paper texture
- Click the arrow next the paper texture preview . The Paper palette is expanded
- Click the palette menu arrow , and choose Edit Paper
- Modify the image
- Select all of your image
- On the Paper palette, click the palette menu arrow , and choose Capture Paper
- Type the name of your new texture, and click OK
Controlling Brightness and Contrast of Paper Texture
Brightness can be thought of as controlling the depth of the paper texture. Paper that is less bright acts as if the texture is shallow.
Contrast can be thought of as controlling the steepness of the paper texture. The texture in higher-contrast paper changes from high to low more quickly and with fewer intermediate levels than the texture in lower-contrast paper.
To change paper texture brightness
- Click the arrow next the paper texture preview . The Paper palette is expanded
- Adjust the Brightness slider to modify the brightness of the paper texture
To change paper texture contrast
- Click the arrow next the paper texture preview . The Paper palette is expanded
- Adjust the Contrast slider to modify the contrast of the paper texture
Inverting and Scaling Paper Textures
Think of paper texture as a three-dimensional landscape. Usually, brushes react to paper texture by coloring peaks and ignoring valleys. You can enable the Invert Paper option to make color fill the valleys instead of the peaks. You can also adjust the paper texture scale to resize the paper texture. Scaling texture affects how the texture appears in brush strokes and images.
To invert paper texture
- Click the arrow next the paper texture preview . The Paper palette is expanded
- Activate the option Invert Paper
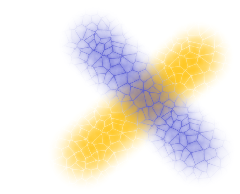
Two brush strokes overlapping. The blue one was painted with the texture inverted.
To change paper texture scale
- Click the arrow next the paper texture preview . The Paper palette is expanded
- Use the Scale slider to resize the paper texture
Scaling large textures can use a great deal of RAM. Most textures are from 50 to 400 pixels square at 100% scaling.
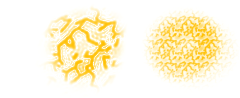
Brush strokes on paper textures with different scale values.