Documentation
- Main Window
- Working with Documents
- Importing images from scanners and cameras
- Guides and Grids
- Plugins
- Pen Tablet Support
- Customize Keyboard Shortcuts
- Customize Performance
- Manage Languages
- Palettes
- Custom Palettes
Gradients
A gradient is a gradual transformation from one color into another. Sometimes gradients are called blends or fountains. Artweaver provides several different types of gradients: linear, radial, square, bilinear, spiral, and conical.
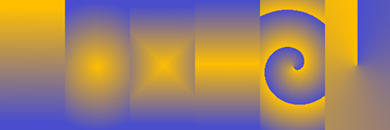
Left to right: linear, radial, square, bilinear, spiral, and conical gradients.
You can use gradients to:
- Fill an image or layer
- Express the gradient in an existing image by mapping gradient colors to image luminance
- Paint with gradient in conjunction with Color Variability
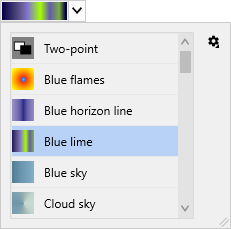
The Gradient palette.
To select a gradient
- Choose Main Window menu -> Window -> Show Tools to display the Tools palette
- Click the arrow next the gradient preview
 . The Gradient palette is expanded
 - Choose a gradient from the Gradient Palette
Creating and Editing Gradients
You can create very simple to very complex gradients. For a simple two-point gradient, you only need to choose a foreground and an background color. For more complex gradients, you can use the Edit Gradient dialog box or capture gradients from existing artwork. Color Segments in the Edit Gradient dialog box specify the point at which a new gradient starts.
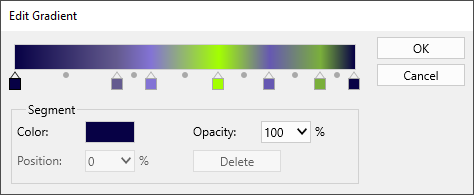
Edit Gradient dialog box.
To create a two-point gradient
- Choose Main Window menu -> Window -> Show Color
- On the Color palette, click the Foreground Color square, and choose a foreground color
- Click the Background Color square, and choose a background color
- Click the arrow next the gradient preview . The Gradient palette is expanded
- Choose Two-Point gradient
To edit or create a complex gradient
- Click the arrow next the gradient preview . The Gradient palette is expanded
- Click the palette menu arrow
 , and choose Edit Gradient
 - The color ramp bar across the top of the Edit Gradient dialog box displays the current gradient. The colored squares along the bottom of the color ramp bar are color segments. You can position these segments to change the color of the blend at individual gradient points
- Click a color segment to select it
- Click the Segment Color square, and choose a segment color
- Repeat both prior steps for each color segment you want to edit
To add color segments
- Click the arrow next the gradient preview . The Gradient palette is expanded
- Click the palette menu arrow , and choose Edit Gradient
- In the Edit Gradient dialog box, click anywhere below the color ramp bar. The color segment is added
- Click the new color segment to select it
- Click the Segment Color square, and choose a segment color
To delete color segments
- Click the arrow next the gradient preview . The Gradient palette is expanded
- Click the palette menu arrow , and choose Edit Gradient
- Click a color segment to select it
- Press Del on the keyboard to delete the color segment
 For a two-point gradient, you set a color for the right color segment and then set a color for the left color segment.
To save a gradient
- Click the arrow next the gradient preview . The Gradient palette is expanded
- Click the palette menu arrow , and choose Save Gradient
- In the Save Gradient dialog box, enter a name for the gradient
Changing Gradient Color Hue
Color hue is represented in the Edit Gradient dialog box by circles located at the midpoints between the adjacent color segments. They allow you to change the hue of the blend within that segment.
To change the color hue
- Click the arrow next the gradient preview . The Gradient palette is expanded
- Click the palette menu arrow , and choose Edit Gradient
- Drag one of the circles below the color ramp bar to change the color hue
Capturing a Gradient from an Image
You can use any existing image as a source for creating new gradients.
To capture a gradient
- Select a area, making the selection as narrow as possible. Artweaver uses the first row starting at the upper left for the gradient
- Click the arrow next the gradient preview . The Gradient palette is expanded
- Click the palette menu arrow , and choose Capture Gradient
- In the Save Gradient dialog box, type a name for the gradient
Mapping a Gradient to Luminance in a Image
You can map a gradient to an existing image, replacing an image's colors with those of the gradient. This effect applies gradient colors to the pixels of the image, based on their luminance values.

Map Gradient.
To map a gradient in an image
- Open the image you want to use
- Click the arrow next the gradient preview . The Gradient palette is expanded
- Click the palette menu arrow , and choose Map Gradient