Adjusting and Editing Brushes
The Brush editor makes it easy to create brush variants. You can adjust brushes in many different ways. In fact, the default brush variants in the Brush selector on the Brush tool property bar are built with the same set of controls used to build every other variant. They have just been adjusted until the results emulate a real-life drawing tool.
Although these default brushes do excellent work, you will probably want to adapt them to your particular needs, refining them to fit your own style of working. You can change their Size, Shape, Angle, Spacing , and much more.
Changes you make to brush variants, including basic controls like Size and Opacity, are saved until the Restore Default Variant command is selected.
|
|
When Artweaver starts, it references the folder Brushes in the user folder. Any customizations made to brushes are saved to this folder and are referenced by Artweaver in place of the original default brushes and settings stored in the application folder. |

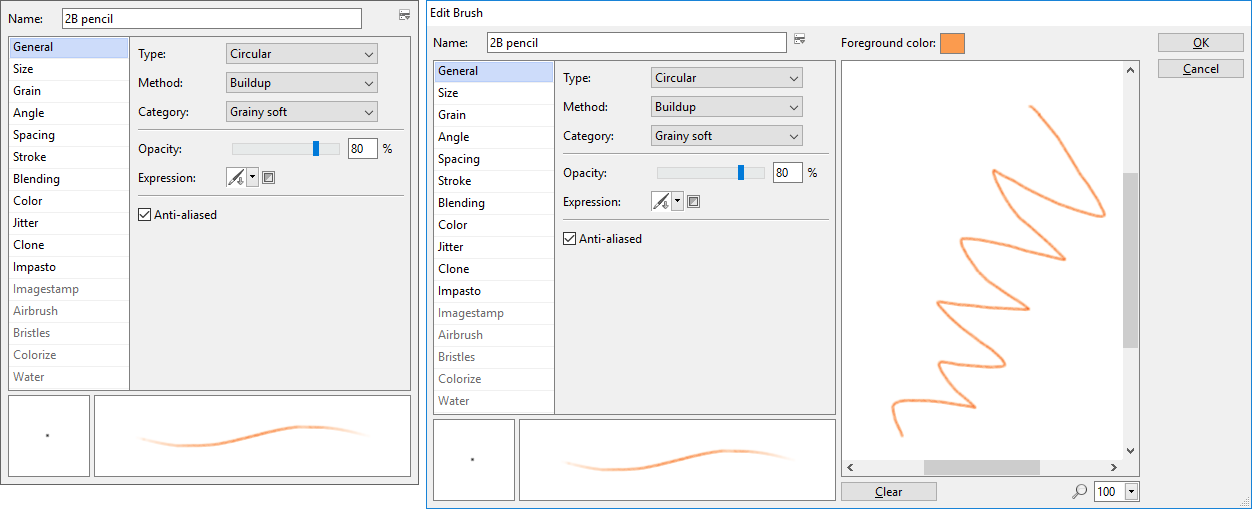
Brush editor (left) and Brush editor with scratch pad (right).
To display the Brush editor
- In the Tools palette, click the Brush tool

- On the property bar, click the Brush settings button
 . The Brush editor is expanded
To display the Brush editor with Scratch pad
- In the Tools palette, click the Brush tool
- Click the arrow next the brush preview
 . The Brush selector is expanded
- Click the palette menu arrow
 , and choose Edit Brush
|
|
This feature is only available in Plus version. |

Brush Types
Brush Types are methods of media application.
To choose a brush type
- In the Tools palette, click the Brush tool
- On the property bar, click the Brush settings button . The Brush editor is expanded
- Click the tab General on the Brush editor
- Choose a type from the Type box
|
Type |
Description |
|
Circular |
Dabs are controlled by the sliders Size and Angle and have a circular look. |
|
Airbrush |
Creates brushes that act like airbrushes. The Feature slider on the property bar controls the size of the individual droplets of media. |
|
Pixel Airbrush |
Creates brushes that work like airbrushes. Brushes that use Pixel Airbrush cannot use the Feature slider to control the size of individual droplets of media. |
|
Captured |
Shapes that you create and capture. |
|
Imagestamp |
Uses one or more images as dab. |
|
Pixel * |
Dabs are controlled by the slider Size and have a square look. |
|
Hairy Brush * |
Creates brushes that act like hairy brushes. The Feature slider on the property bar controls the amount of the individual bristles. |
|
|
* Only available in Plus version. |
Methods and Categories
The brush method defines the most basic level of brush behavior and is the foundation on which all other brush variables build.
Because the method sets a brush variants most basic behavior, you can alter a variants behavior by changing its method.
Each method can have several variations, called method categories. These categories further refine the brush behavior. The following terms are used in describing most method categories:
- Soft methods produce strokes with feathered edges
- Flat methods produce hard, aliased strokes with pixelated edges
- Hard methods produce smooth strokes
- Grainy methods produce brush strokes that react to paper texture
Combining a method with a method category results in a specific brush style that you can assign to a given brush.
To choose a method and category
- In the Tools palette, click the Brush tool
- On the property bar, click the Brush settings button . The Brush editor is expanded
- Click the tab General on the Brush editor
- Choose a method from the Method box
- Choose a category from the Category box
|
Method |
Description |
|
Cover |
The Cover method produce brush strokes that cover underlying and the own strokes. |
|
Soft Cover |
The Soft Cover method produce brush strokes that cover underlying strokes. |
|
Buildup |
The Buildup method produce brush strokes that build toward black as you overlay them. |
|
Eraser |
The Eraser method erase the underlying colors, or replace the underlying colors by the paper color. |
|
Smear |
The Smear method interact with the underlying colors to distort the image. |
|
Clone |
The Clone method take images from a clone source and re-create them in another location. |
|
Colorize * |
The Colorize method produce brush strokes that are bounded by underlying colors. |
|
Warp * |
The Warp method interact with the underlying colors to warp the image. |
|
Other * |
The Other method lighten, or darken the underlying colors, or apply effect filter. |
|
|
* Only available in Plus version. |
Size Controls
The Size slider determines the width of the brush stroke. The Minimum Size slider determines the minimum width of the brush stroke. You can use the Expressions settings to link Size to pen or mouse data.
The Brush Preview Window shows how your changes affect the brush.
To set brush size
- In the Tools palette, click the Brush tool
- On the property bar, click the Brush settings button . The Brush editor is expanded
- Click the tab Size on the Brush editor
- Move the Size slider to the right to increase brush size, or to the left to reduce brush size
|
|
You can also set the brush size on the property bar. |
To use the resize shortcut
- Hold down
 on the keyboard
 - With the Brush tool, drag in the image window
- A circle representing the brush size is displayed beside the pointer. When the circle is the size you want, release the mouse button
To set minimum size
- In the Tools palette, click the Brush tool
- On the property bar, click the Brush settings button . The Brush editor is expanded
- Click the tab Size on the Brush editor
- Move the Minimum Size slider to the right to increase the minimum width of the brush stroke. Move it to the left to reduce the minimum width
|
|
This feature is only available in Plus version. |
Opacity and Grain
The Opacity slider determines how the density of the media should be applied. It sets the maximum opacity of the selected brush. You can use the Expressions settings to link Opacity to pen or mouse data.
The Grain slider determines the maximum amount of paper texture that should reveal in a brush stroke. You can use the Expressions settings to link Grain to pen or mouse data. You can also use the paper's brightness and contrast settings to control Grain interaction.
To set brush opacity
- In the Tools palette, click the Brush tool
- On the property bar, click the Brush settings button . The Brush editor is expanded
- Click the tab General on the Brush editor
- Move the Opacity slider to the left to reduce opacity, or to the right to increase opacity
To set brush grain
- In the Tools palette, click the Brush tool
- On the property bar, click the Brush settings button . The Brush editor is expanded
- Click the tab Grain on the Brush editor
- Move the Grain slider to the left to increase the penetration into the paper texture. Move it to the right to reduce the penetration
Adjusting Paper Texture behavior
When you use a brush that interacts with paper texture, the results appear with each stroke. If you have a stylus and tablet, you can adjust paper texture by changing the stroke of the stylus on a pressure-sensitive tablet. In most cases, a light stroke colors only the peaks and ridges of the texture. A heavy stroke fills color deep into the pockets and valleys. You can also affect the brush interaction with paper texture by changing the brush grain settings.
By default, paper texture is fixed, which means that the texture is in the same position each time you apply a brushstroke. You can change this setting if you want texture to be applied randomly.
|
|
This feature is only available in Plus version. |
To randomize paper texture
- In the Tools palette, click the Brush tool
- On the property bar, click the Brush settings button . The Brush editor is expanded
- Click the tab Grain on the Brush editor
- Enable the Randomize texture check box
Brush Tip Profiles
The brush tip, or profile, shows a cross-section of density distribution across the diameter of the dab.
Different media have different density distributions. Changes in the density distribution produce different marking qualities in a brush stroke.
The following brush tip profiles are available:
|
|
Has a wide area of greater density at the center, with rapid falloff to the edge. |
|
|
Provides maximum density at the center, with high density weighting to the edge. |
|
|
Provides maximum density at the center, with even falloff to the edge. |
|
|
Provides maximum density at the outer edge in a ringlike fashion, with medium internal density. |
|
|
1-Pixel Edge provides maximum density throughout, with rapid falloff at the edge, producing a 1-pixel, anti-aliased edge. |
|
|
Provides maximum density at the center, with soft falloff to the edge. |


Anti-aliasing
Artweaver can draw dabs in an anti-aliased fashion. This anti-aliasing gives brushes a smooth edge, as opposed to the jagged edges without anti-aliasing.
|
|
This feature is only available in Plus version. |
To enable drawing dabs in an anti-aliased fashion
- In the Tools palette, click the Brush tool
- On the property bar, click the Brush settings button . The Brush editor is expanded
- Click the tab General on the Brush editor
- Enable the Anti-aliased check box
Spacing Controls
When a brush is used, the stroke consists of a series of dabs. By adjusting the spacing between those dabs, you can control the continuity of the brush stroke.
The Spacing slider controls the distance between brush dabs in a stroke. Each dot or dash represents one brush dab.
Continuous Time Deposition controls whether you must move a brush before a medium is applied. With Continuous Time Deposition enabled, the medium begins flowing at the first touch.
|
|
When the Continuous Time Deposition check box is disabled, you must move the brush (even just slightly) to cause color to be deposited. |
To set brush spacing
- In the Tools palette, click the Brush tool
- On the property bar, click the Brush settings button . The Brush editor is expanded
- Click the tab Spacing on the Brush editor
- Do one of the following:
- To increase the spacing between dabs, move the Spacing slider to the right bringing it closer to the size of the dab itself
- To decrease the distance between dabs, move the Spacing slider to the left until the dabs begin to overlap
To set Continuous Time Deposition
- In the Tools palette, click the Brush tool
- On the property bar, click the Brush settings button . The Brush editor is expanded
- Click the tab Spacing on the Brush editor
- Enable the Continuous Time Deposition check box
Stroke Controls
The Smoothing slider allows you to soften the appearance of brushstrokes by adding additional points into dab paths which are used to replot brushstrokes.
You can also apply a merge mode to a brush variant to control how brushstrokes interact with the underlying colors within the currently selected layer or the canvas. This technique allows you to produce similar results to applying blend method to layers. In addition, it allows you to control where the effect is applied.
|
|
This feature is only available in Plus version. |
To set smooth strokes
- In the Tools palette, click the Brush tool
- On the property bar, click the Brush settings button . The Brush editor is expanded
- Click the tab Stroke on the Brush editor
- Move the Smoothing slider to the right to add points and even out jagged strokes. Move it to the left to decrease the number of additional points
To apply a merge mode
- In the Tools palette, click the Brush tool
- On the property bar, click the Brush settings button . The Brush editor is expanded
- Click the tab Stroke on the Brush editor
- From the Merge Mode list box, choose one of the merge modes
- Move the Stroke Opacity slider
|
Merge Mode |
Description |
|
Normal |
Edits or paints each pixel to make it the result color. |
|
Darken |
Looks at the color information in each channel and selects the base or blend color—whichever is darker—as the result color. |
|
Multiply |
Looks at the color information in each channel and multiplies the base color by the blend color. The result color is always a darker color. |
|
Lighten |
Looks at the color information in each channel and selects the base or blend color—whichever is lighter—as the result color. |
|
Screen |
Looks at each channel's color information and multiplies the inverse of the blend and base colors. The result color is always a lighter color. |
|
Difference |
Looks at the color information in each channel and subtracts either the blend color from the base color or the base color from the blend color, depending on which has the greater brightness value. |
|
Exclusion |
Creates an effect similar to but lower in contrast than the Difference mode. |
|
Color burn |
Looks at the color information in each channel and darkens the base color to reflect the blend color by increasing the contrast between the two. |
|
Linear burn |
Looks at the color information in each channel and darkens the base color to reflect the blend color by decreasing the brightness. |
|
Color dodge |
Looks at the color information in each channel and brightens the base color to reflect the blend color by decreasing contrast between the two. |
|
Hard light |
Multiplies or screens the colors, depending on the blend color. |
|
Soft light |
Darkens or lightens the colors, depending on the blend color. |
|
Average |
Applies the Normal mode with 50% opacity. |
|
Overlay |
Multiplies or screens the colors, depending on the base color. |
Angle Controls
The Angle slider controls the angle of an elliptical brush and the length of the ellipse. You can use the Expressions settings to link Angle to pen or mouse data.
The Shape slider controls the shape of the brush. Squeezing a brush changes it from round to elliptical.
You can use the Angle and Shape controls with Circular, Captured and Imagestamp brush types.
|
|
This feature is only available in Plus version. |
To set brush shape
- In the Tools palette, click the Brush tool
- On the property bar, click the Brush settings button . The Brush editor is expanded
- Click the tab Angle on the Brush editor
- Move the Shape slider to the left to make the brush more elliptical. Move it to the right to make it rounder
To set angle for a elliptical brush
- In the Tools palette, click the Brush tool
- On the property bar, click the Brush settings button . The Brush editor is expanded
- Click the tab Angle on the Brush editor
- Move the Angle slider to the right to rotate the brush counterclockwise. Move the slider to the left to rotate the brush clockwise
Blending Controls
The Blending controls determine how a brush conveys its medium (color) to the paper. You can choose from several preset to suit your needs.
Whether you are painting with a single color or blending two or more colors on a layer, the Pickup color from underlying layers option can help you produce brushstrokes without white fringes.
The Resaturation, Bleed, and Dryout controls work together to determine how much color a brush has at the start and finish of a stroke.
The Resaturation slider controls the amount of color that is replenished in a stroke. If it is set at zero, the brush does not produce any color.
The Bleed slider controls how much the brush colors smear underlying colors, including the paper color.
The Dryout control determines how quickly a brush runs out of medium. Dryout is measured in pixels.
To set resaturation
- In the Tools palette, click the Brush tool
- On the property bar, click the Brush settings button . The Brush editor is expanded
- Click the tab Blending on the Brush editor
- Move the Resaturation slider to the left to reduce the amount of color replenished in stroke. Move it to the right to increase the amount of color
|
|
You can also set resaturation on the property bar. |
To set color bleed
- In the Tools palette, click the Brush tool
- On the property bar, click the Brush settings button . The Brush editor is expanded
- Click the tab Blending on the Brush editor
- Move the Bleed slider to the left to reduce the amount of interaction with underlying pixels. Move it to the right to increase the interaction
|
|
You can also set color bleed on the property bar. |
To set brush dryout
- In the Tools palette, click the Brush tool
- On the property bar, click the Brush settings button . The Brush editor is expanded
- Click the tab Blending on the Brush editor
- Move the Dryout slider to the left to shorten the distance the brush can move before it dries out. Move it to the right to lengthen the distance
To choose pickup color from underlying layers
- In the Tools palette, click the Brush tool
- On the property bar, click the Brush settings button . The Brush editor is expanded
- Click the tab Blending on the Brush editor
- Enable the Pickup color from underlying layers check box
|
|
This feature is only available in Plus version. |
Color Variability Controls
Color variability allows you to create brush strokes of more than one color. Variability can be used to enhance the Natural-Media appearance of your work. Color variability can be set for HSL or RGB mode, and it can be based on the current gradient or color set.
To set color variability in HSL mode
- On the Color palette, choose a foreground color
- In the Tools palette, click the Brush tool
- On the property bar, click the Brush settings button . The Brush editor is expanded
- Click the tab Color on the Brush editor
- Choose in the Color Variability box In HSL
- Adjust the Hue (±H), Saturation (±S), and Luminance (±L) sliders to control hue, saturation, and luminance ranges for color variability
- Moving the Hue (±H) slider to the right increases the number of hues in the resulting brush stroke. These colors are the ones adjacent to the selected color on the color wheel
- Moving the Saturation (±S) slider to the right increases variability in the color intensity of the brush stroke
- Moving the Luminance (±L) slider to the right increases variability in the brightness of the brush stroke
|
|
When you save a brush variant, the current color variability setting is also saved. |
To set color variability in RGB mode
- On the Color palette, choose a foreground color
- In the Tools palette, click the Brush tool
- On the property bar, click the Brush settings button . The Brush editor is expanded
- Click the tab Color on the Brush editor
- Choose in the Color Variability box In RGB
- Move the ±R (Red), ±G (Green), and ±B (Blue) sliders to control color variability of red, green, and blue values
To set color variability based on the current color set
- On the Color palette, choose a foreground color
- In the Tools palette, click the Brush tool
- On the property bar, click the Brush settings button . The Brush editor is expanded
- Click the tab Color on the Brush editor
- Choose in the Color Variability box From Color Set
- Color variability is now based on random colors from the current color set
To set color variability based on the current gradient
- On the Color palette, choose a foreground color
- In the Tools palette, click the Brush tool
- On the property bar, click the Brush settings button . The Brush editor is expanded
- Click the tab Color on the Brush editor
- Choose in the Color Variability box From Gradient
- Color variability is now based on random colors from the current gradient
Random Controls
The Jitter control introduces a randomized jitter to the brush stroke. Instead of appearing directly along the stroke, dabs appear randomly outside the brush stroke path.
To set brush Jitter
- In the Tools palette, click the Brush tool
- On the property bar, click the Brush settings button . The Brush editor is expanded
- Click the tab Jitter on the Brush editor
- Move the Jitter slider to the left to decrease deviation from the stroke path, or to the right to increase the deviation
Airbrush Controls
The Airbrush controls allow you to adjust the amount and the displacement of the media that is applied by an airbrush.
Feature lets you set the size of individual paint droplets.
Flow controls how much media is applied by an airbrush stroke. The Flow control acts like the needle control on a real airbrush. Because the airbrush dab types deposit many small dabs to create their spray-paint look, you might need to cut down on the flow to speed up the airbrush.
Pressure controls how fast the medium flows when Continuous Time Deposition is enabled.
You can also link an Expression setting to both the Flow and Feature controls. This lets you link the controls to a stylus or mouse movement.
To set Airbrush feature
- In the Tools palette, click the Brush tool
- On the property bar, click the Brush settings button . The Brush editor is expanded
- Click the tab Size on the Brush editor
- Move the Feature slider to the left to reduce the size of individual paint droplets, or to the right to increase it
To set ink flow
- In the Tools palette, click the Brush tool
- On the property bar, click the Brush settings button . The Brush editor is expanded
- Click the tab Airbrush on the Brush editor
- Move the Flow slider to the left to reduce the smallest amount of media applied with a stroke, or to the right to increase it
|
|
This feature is only available in Plus version. |
To set Airbrush pressure
- In the Tools palette, click the Brush tool
- On the property bar, click the Brush settings button . The Brush editor is expanded
- Click the tab Airbrush on the Brush editor
- Move the Pressure slider to the left to reduce the smallest amount of media applied by Continuous Time Deposition, or to the right to increase it
|
|
Continuous Time Deposition must be enabled to apply this option. |
|
|
This feature is only available in Plus version. |
Expression Settings
You can control brush effects along the stroke based on a number of real-time input factors. You can use the Expression settings on the Brush editor to vary these effects.
To choose a Expression setting
- In the Tools palette, click the Brush tool
- On the property bar, click the Brush settings button . The Brush editor is expanded
- Click a tab on the Brush editor
- Choose an option from the Expression menu
|
Expression |
Description |
|
|
Applies no adjustment to the brush feature. |
|
|
Adjusts the brush feature based on pen pressure. Greater pressure increases the setting for that brush feature. |
|
|
Adjusts the brush feature on a random basis. |
|
|
Adjusts the selected brush feature based on the direction of the stroke. |
|
|
Increases the brush feature to maximum to begin again at minimum. |
|
|
Adjusts the brush feature based on the dragging speed. Dragging quickly minimizes the setting; dragging more slowly increases it. |
|
|
Increases the brush feature to maximum. |
|
|
Decreases the brush feature to minimum. |


